Start With Equipment Footprint and Clearance
Finishing and converting equipment booths cannot be planned like standard product display booths. The equipment itself affects the layout from the beginning.
Before deciding the booth structure, exhibitors should confirm the machine footprint, clearance needs, viewing angle, operator access, power location, and how the equipment will move into the booth space. If these details are handled late, the booth may look good in design but become difficult to install or demonstrate on-site.
A strong equipment booth should give buyers a clear view of the process while leaving enough space for staff to explain the machine, answer questions, and manage safe movement around the display.
A finishing and converting equipment booth should start with machine footprint, clearance, access, and viewing space before the booth structure or graphics are finalized.
Finishing and Converting Equipment Booth Areas and Their Roles
Booth Area | Main Job | Planning Note |
|---|---|---|
Equipment zone | Display the machine or converting process | Confirm footprint, clearance, and access before booth design |
Buyer viewing area | Let visitors watch or inspect the equipment | Keep viewing space open without blocking traffic |
Process screen | Explain what the machine does | Use short visuals instead of long technical text |
Demo counter | Support technical questions and follow-up | Place it near the viewing area but away from equipment access |
Power route | Support equipment and screen operation | Plan early with the show-site setup requirements |
Freight path | Move equipment into the booth space | Review move-in timing before final layout approval |
Storage | Hide tools, cases, literature, and backup parts | Keep it close to staff but out of buyer view |
Staff position | Guide buyer questions and equipment explanation | Staff should not block the machine or viewing angle |
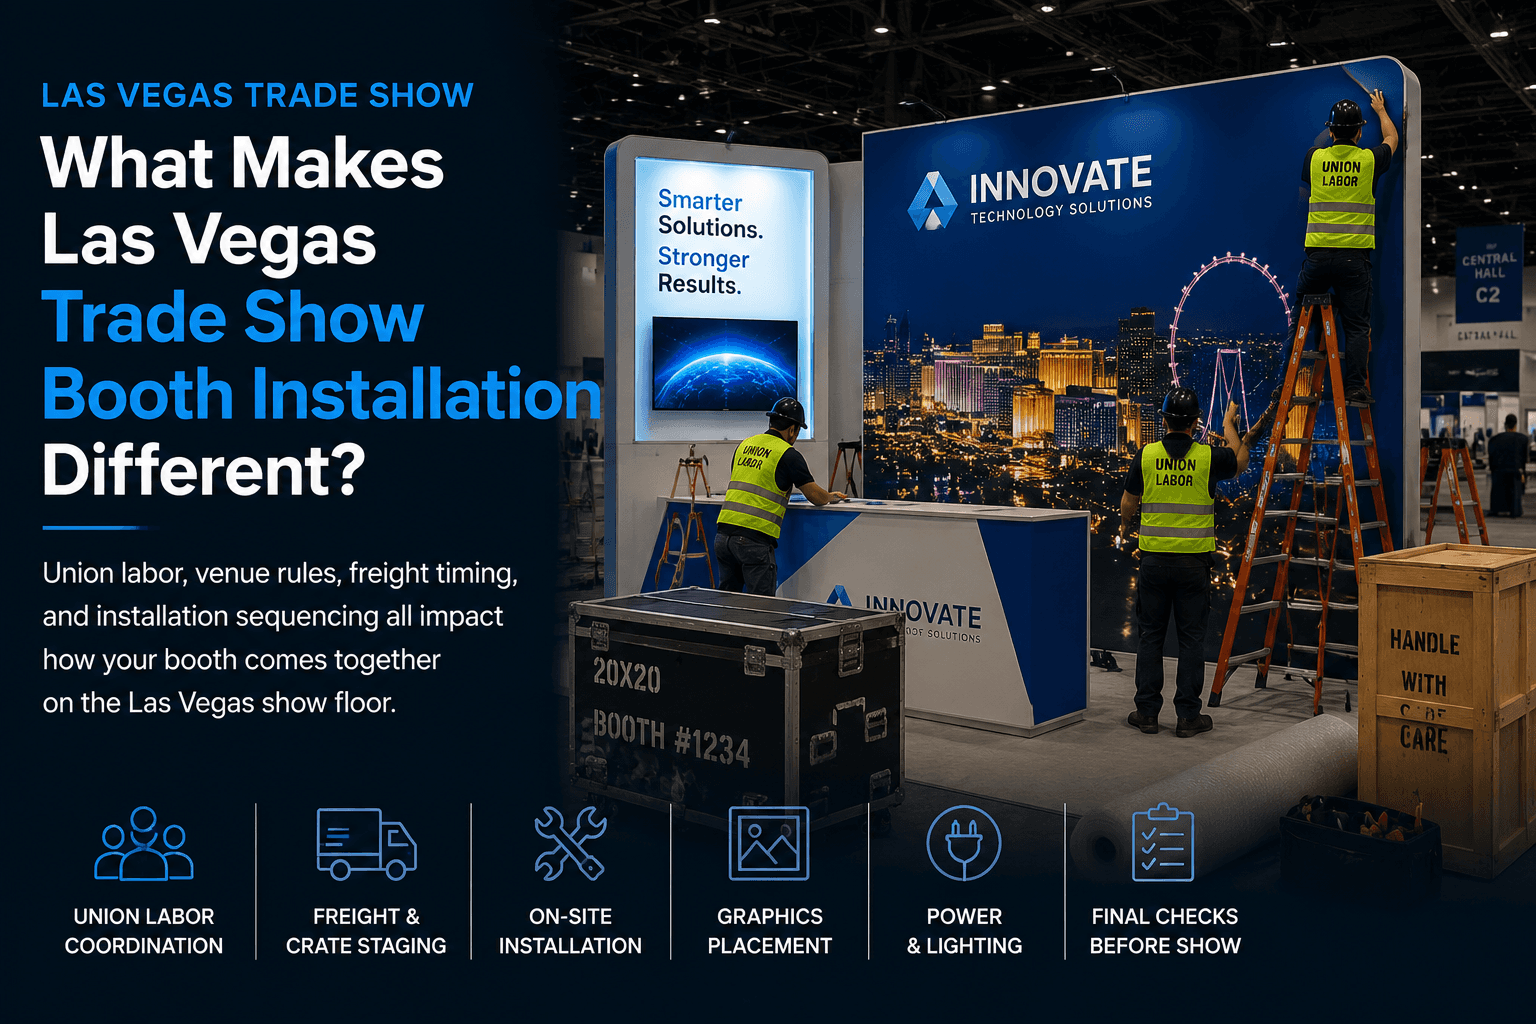
Plan Power, Freight, and Move-In Before Booth Design
For finishing and converting equipment exhibitors, show-site details can shape the booth as much as visual design.
Power routing, freight handling, crate movement, equipment placement, and installation timing should be reviewed before the booth layout is locked. If the equipment needs specific access, service clearance, or controlled placement, those requirements should guide the booth plan from the beginning. This is where logistics and pre-show coordination becomes important.
Show the Machine Without Blocking Buyer Flow
The equipment should be visible, but it should not control the entire booth in a way that blocks movement. Buyers need space to stop, look, ask questions, and move on without crowding the aisle.
A better layout separates the equipment viewing area from the staff conversation point. This gives visitors a way to understand the machine first, then continue into a technical discussion if the product fits their needs.
This is especially useful for booths showing die cutting equipment, finishing systems, converting equipment, inspection systems, overprinting equipment, slitting or rewinding systems, process control equipment, or auxiliary production equipment.

The equipment should stay visible while leaving enough space for buyers to stop, watch the process, ask questions, and move through the booth without crowding the aisle.
Use Screens to Explain the Process
Screens can be useful for equipment booths because not every process can be shown live at full speed. A short screen loop can explain what happens before, during, and after the machine process.
Good screen content can show process steps, input and output examples, inspection points, workflow sequence, finishing result, safety or access details, before-and-after comparison, and production application.
The screen should support the equipment display, not replace it. Buyers should be able to see the machine, understand the process, and then ask staff for more technical detail.
When a 30x40 Booth Makes Sense
A smaller booth may work for compact equipment or a static display, but many finishing and converting exhibitors need more space for machine placement, buyer viewing, process explanation, storage, and staff movement.
A 30x40 booth often makes sense when the exhibitor needs equipment display with clearance, buyer viewing space, demo or inspection area, screen-based process explanation, staff discussion space, storage for tools and support materials, freight and installation access, and a stronger brand presence around the equipment. For exhibitors comparing larger booth layouts, 30x40 booth planning is a useful reference because equipment booths often need more than product visibility.
Installation and Handoff Notes
Equipment booths should have a clear handoff between design, fabrication, freight, installation, and final show-site setup.
Before the booth opens, the team should confirm equipment placement, power access, screen function, lighting around the equipment, graphics alignment, staff access, storage location, safety clearance, buyer viewing area, and final booth walkthrough. For equipment-focused exhibitors, on-site installation and dismantle support should be considered part of the booth planning process, not only a final setup task.
For exhibitors reviewing real Labelexpo booth examples, the IMP Label Expo 2024 project gallery offers a 20x20 technical product booth reference with aisle-facing branding, product graphics, meeting space, and visitor flow. For equipment-focused booths, the same planning logic should be expanded around machine footprint, clearance, freight, power, and installation handoff.

Equipment-focused booths need early planning for power routing, freight timing, installation handoff, storage, staff access, and final show-site setup before the show opens.
Finishing and Converting Equipment Booth Checklist
Before finalizing a LOUPE Americas finishing and converting equipment booth, review these points:
Is the machine footprint confirmed?
Does the booth allow enough clearance around the equipment?
Can buyers view the equipment without blocking aisle traffic?
Is power routing planned before layout approval?
Is the freight and move-in sequence clear?
Is there a screen or graphic area to explain the process?
Can staff answer technical questions near the equipment?
Is storage planned for tools, cases, and support materials?
Does the booth size fit the equipment and buyer flow?
Is the final installation handoff clearly planned?
For broader event planning, the main LOUPE Americas booth planning page can connect finishing and converting equipment needs with label printing, flexible packaging, booth size, and show-site setup.
FAQ
What makes a finishing and converting equipment booth different?
A finishing and converting equipment booth needs to plan around machine footprint, clearance, power, freight, move-in, viewing space, and installation. These details affect the layout before graphics or booth structure are finalized.
Does an equipment booth need a screen?
A screen is useful when the machine process is difficult to explain quickly. It can show workflow steps, input and output examples, inspection points, or before-and-after results while the equipment remains the main focus.
What booth size works well for converting equipment exhibitors?
A compact booth may work for smaller equipment, but a 30x40 booth is often better when the exhibitor needs equipment clearance, buyer viewing space, process explanation, storage, staff movement, and show-site access.
Final Takeaway
A LOUPE Americas finishing and converting equipment booth should not start with visual design alone. The booth should start with the equipment: footprint, clearance, power, freight, move-in, viewing space, and installation requirements.
Once those details are clear, the booth can organize process screens, buyer flow, staff conversations, storage, and show-site setup around a layout that makes the equipment easier to understand and easier to operate on the floor.