
30x40 Trade Show Booth Planning
A large island booth footprint for product demonstrations, private meetings, screen walls, branded structures, storage, and coordinated show-site execution.
A 30x40 trade show booth gives exhibitors enough space to build a larger island presence with separate areas for demos, meetings, reception, storage, and brand storytelling.
This size is often used when the booth needs to handle more traffic, show more products, support multiple staff roles, or create a stronger visual presence across the aisle. The planning challenge is not filling the space. It is making the layout easy to understand, realistic to build, and ready for the venue schedule.

What fits inside a 30x40 trade show booth?
A 30x40 booth makes sense when the exhibit needs more than one active zone. This size can support larger demos, private or semi-private meetings, stronger brand structures, and a clearer visitor path without forcing everything into the same space.
It is often a good fit for exhibitors with larger product lines, technical demonstrations, multiple buyer conversations, screen-based education, or high-traffic shows where the booth needs to stay open and organized during busy hours.
What fits inside a 30x40 trade show booth?
A customizable trade show booth rental in Las Vegas uses a reusable booth structure with branded graphics, adaptable counters, display areas, lighting, and meeting zones. It gives exhibitors a faster path than a fully custom build while still requiring logistics planning, drayage timing, labor coordination, and on-site installation at major venues like LVCC, Venetian Expo, and Mandalay Bay.
When a 30x40 Booth Makes Sense
When a 30x40 Booth Makes Sense
A 30x40 booth makes sense when the exhibit needs more than one active zone. This size can support larger demos, private or semi-private meetings, stronger brand structures, and a clearer visitor path without forcing everything into the same space.
It is often a good fit for exhibitors with larger product lines, technical demonstrations, multiple buyer conversations, screen-based education, or high-traffic shows where the booth needs to stay open and organized during busy hours.
Large product demos
Useful when products, equipment, samples, or screens need more room for visitors to stop, compare, and ask questions.
Private meeting flow
A 30x40 booth can support enclosed or semi-private meeting areas without blocking the main demo path.
Stronger brand structure
Large walls, hanging signs, towers, lightboxes, and screen displays can make the booth readable from multiple aisles.
Storage and operations
The larger footprint gives staff more room for hidden storage, samples, tools, literature, and daily booth support.
30x40 and Large Island Booth Project References
Review real booth projects with 30x40 and nearby large island footprints. These examples show how layout, branded structures, meeting areas, product displays, logistics, fabrication, and installation change when the booth moves into a larger island format.

large Booth
CES 2024
CUB (CubTEK)
A 30x40 CES case study for CUB, showing how an automotive electronics and ADAS booth was planned for strong island visibility, real vehicle-centered engagement, and venue-aware execution at LVCC West Hall.
LVCC West Hall, Las Vegas, NV

Large Booth
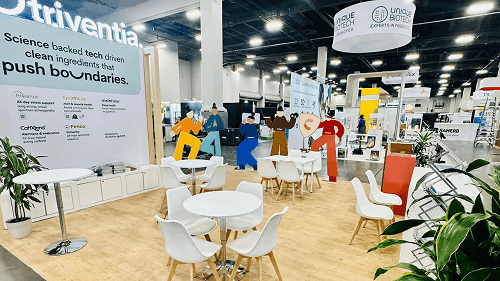
NAA Apartmentalize 2024
ResidentIQ
ResidentIQ’s NAA Apartmentalize 2024 case study: a big multi-brand booth designed for long-range visibility, clear demo zoning, and meeting flow. Execution covered venue-timed staging, power/data routing for screens, labor sequencing, and final closeout for demo readiness.
Pennsylvania Convention Center

Large Booth
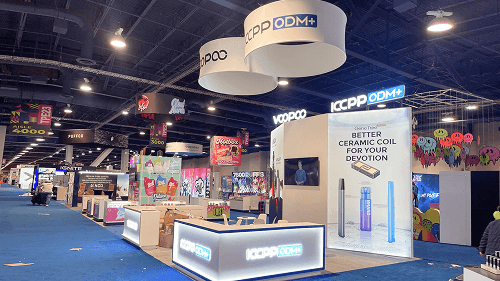
NAA Apartmentalize 2024
ResMan
A large NAA Apartmentalize case study for ResMan, showing how property management platform demos, dashboard-led workflows, and LVCC show-floor execution came together in one clear proptech booth system.
Philadelphia, PA

Large Booth
SEMA Show 2023.
GTECHNIQ.
A large SEMA case study for GTECHNIQ, showing how vehicle display, ceramic coating storytelling, and LVCC show-floor execution came together in one bold automotive protection booth system.
Las Vegas Convention Center, Las Vegas, NV, US.

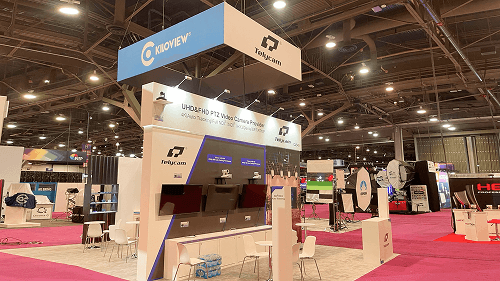
Large Booth
CES 2024
UGREEN.
A CES 2024 case study for UGREEN, showing how a suspended halo sign, global-presence messaging, NAS product storytelling, and structured show-floor execution came together in one readable large-format tech booth.
Las Vegas, NV, US. CES official materials confirm the 2024 show took place in Las Vegas.

Large Booth
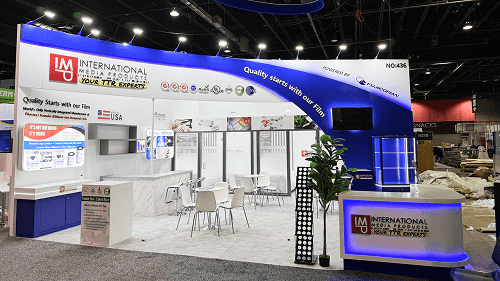
SEMA Show 2023
UPPF
A large SEMA case study for UPPF, showing how vehicle display, paint protection film storytelling, and LVCC show-floor execution came together in one bold automotive protection booth system.
Las Vegas Convention Center, Las Vegas, NV, US.
large Booth
CES 2024
CUB (CubTEK)
A 30x40 CES case study for CUB, showing how an automotive electronics and ADAS booth was planned for strong island visibility, real vehicle-centered engagement, and venue-aware execution at LVCC West Hall.
LVCC West Hall, Las Vegas, NV
Large Booth
CES 2024
UGREEN.
A CES 2024 case study for UGREEN, showing how a suspended halo sign, global-presence messaging, NAS product storytelling, and structured show-floor execution came together in one readable large-format tech booth.
Las Vegas, NV, US. CES official materials confirm the 2024 show took place in Las Vegas.
Large Booth
SEMA Show 2023.
GTECHNIQ.
A large SEMA case study for GTECHNIQ, showing how vehicle display, ceramic coating storytelling, and LVCC show-floor execution came together in one bold automotive protection booth system.
Las Vegas Convention Center, Las Vegas, NV, US.
Large Booth
NAA Apartmentalize 2024
ResMan
A large NAA Apartmentalize case study for ResMan, showing how property management platform demos, dashboard-led workflows, and LVCC show-floor execution came together in one clear proptech booth system.
Philadelphia, PA
Large Booth
NAA Apartmentalize 2024
ResidentIQ
ResidentIQ’s NAA Apartmentalize 2024 case study: a big multi-brand booth designed for long-range visibility, clear demo zoning, and meeting flow. Execution covered venue-timed staging, power/data routing for screens, labor sequencing, and final closeout for demo readiness.
Pennsylvania Convention Center
Large Booth
SEMA Show 2023
UPPF
A large SEMA case study for UPPF, showing how vehicle display, paint protection film storytelling, and LVCC show-floor execution came together in one bold automotive protection booth system.
Las Vegas Convention Center, Las Vegas, NV, US.
Want to compare more large island layouts, graphics, fabrication, and installation details? View more trade show booth case studies, review SEMA booth planning for vehicle displays, or explore Las Vegas automotive trade show booth planning for larger vehicle displays, product walls, demo counters, graphics, logistics, and show-site setup needs.
How to Plan a 30x40 Booth Layout
A 30x40 booth should be planned around zones, not just square footage. The booth may include a reception point, one or more demo areas, a meeting area, a storage zone, branded structures, screen walls, and product displays. If these areas are not organized early, the booth can feel large but confusing.
The strongest 30x40 layouts usually have one clear visual anchor and a natural path from the aisle into the booth. Visitors should understand where to enter, where the main demo happens, and where staff can continue deeper conversations.
Start with the main booth action.
Decide whether the booth is built around demos, meetings, product display, hospitality, lead capture, or technical explanation.
Keep high-traffic zones open.
Reception and demo points should welcome visitors without blocking movement across the booth.
Place meeting areas with purpose.
Meeting spaces should feel available but not exposed to the main aisle traffic.
Plan large graphics by distance.
A 30x40 booth needs graphics that work from far away and still make sense when visitors are inside the booth.
For technology exhibitors, a 30x40 booth can separate product demos, screen-based presentations, private meetings, and storage without crowding the main visitor path. CES booth planning is a useful reference when the layout needs multiple demo zones, branded walls, and clear movement between product displays.
If your exhibit needs a strong island presence but does not require multiple large demo zones, private meeting areas, or a larger back-of-house footprint, compare the 30x30 booth planning guide before finalizing a 30x40 layout.
How to Plan a 30x40 Booth Layout
A customizable trade show booth rental in Las Vegas uses a reusable booth structure with branded graphics, adaptable counters, display areas, lighting, and meeting zones. It gives exhibitors a faster path than a fully custom build while still requiring logistics planning, drayage timing, labor coordination, and on-site installation at major venues like LVCC, Venetian Expo, and Mandalay Bay.
Start with the main booth action.
Decide whether the booth is built around demos, meetings, product display, hospitality, lead capture, or technical explanation.
Keep high-traffic zones open.
Reception and demo points should welcome visitors without blocking movement across the booth.
Place meeting areas with purpose.
Meeting spaces should feel available but not exposed to the main aisle traffic.
Plan large graphics by distance.
A 30x40 booth needs graphics that work from far away and still make sense when visitors are inside the booth.
A customizable trade show booth rental in Las Vegas uses a reusable booth structure with branded graphics, adaptable counters, display areas, lighting, and meeting zones. It gives exhibitors a faster path than a fully custom build while still requiring logistics planning, drayage timing, labor coordination, and on-site installation at major venues like LVCC, Venetian Expo, and Mandalay Bay.
A customizable trade show booth rental in Las Vegas uses a reusable booth structure with branded graphics, adaptable counters, display areas, lighting, and meeting zones. It gives exhibitors a faster path than a fully custom build while still requiring logistics planning, drayage timing, labor coordination, and on-site installation at major venues like LVCC, Venetian Expo, and Mandalay Bay.
30x40 Booth Design and Production Details
A 30x40 booth usually has more structural parts than a smaller island. Larger walls, counters, towers, storage rooms, lightboxes, screen walls, overhead elements, and branded surfaces need to be planned before production begins.
The booth should be checked for structure, graphic fit, hardware, finish quality, crate order, and installation readiness before freight moves to the venue. For a larger island layout, [booth fabrication and prebuild checks](/services/booth-fabrication-prebuild-checks) help reduce last-minute fit issues and make show-site setup more controlled.
Rental-Friendly or Custom 30x40 Booth?
A 30x40 booth can sometimes use rental-friendly systems, but this size often starts to need more custom planning. The difference is not only the structure. It is how the booth supports visitor flow, brand visibility, product demonstrations, meetings, lighting, storage, and installation.
A rental-friendly 30x40 booth can work when the exhibitor wants a large branded presence with reusable structures, modular walls, graphics, counters, and screen areas.
A custom 30x40 booth makes more sense when the project needs unique architecture, larger product displays, private meeting rooms, overhead branding, specialty finishes, or a multi-show structure built around a specific brand experience.
Either way, the booth still needs careful planning around fabrication, graphics, freight, drayage, labor timing, and dismantle.
30x40 Booth Execution in Las Vegas
For Las Vegas shows, a 30x40 booth needs early venue-aware planning. LVCC, Venetian Expo, Mandalay Bay, and Caesars Forum can involve different move-in windows, dock access, union labor coordination, drayage timing, electrical orders, and installation sequencing.
A 30x40 booth may include larger crates, multiple wall sections, branded towers, hanging signs, screen walls, meeting furniture, flooring, lighting, and packed components that must reach the booth space in the right order. For exhibitors preparing a 30x40 booth in Las Vegas, Las Vegas trade show booth builder support can help connect layout, fabrication, logistics, and show-site execution.
30x40 Booth Execution in Las Vegas
A customizable trade show booth rental in Las Vegas uses a reusable booth structure with branded graphics, adaptable counters, display areas, lighting, and meeting zones. It gives exhibitors a faster path than a fully custom build while still requiring logistics planning, drayage timing, labor coordination, and on-site installation at major venues like LVCC, Venetian Expo, and Mandalay Bay.
Common 30x40 Booth Mistakes to Avoid
A 30x40 booth gives more room, but it also creates more decisions. If the layout is not controlled, the booth can become expensive to build, difficult to install, and harder for visitors to understand.
Too many focal points
If every wall, screen, and counter competes for attention, visitors may miss the main message.
Meeting rooms placed too early
Private spaces should not block the strongest entry path or hide the main booth experience.
Demo areas without enough viewing space
Large demos need room for visitors to stand, watch, ask questions, and move away without crowding the aisle.
Graphics without hierarchy
A large booth needs primary, secondary, and close-range messages. Small text everywhere makes the booth harder to read.
Storage planned too late
Samples, tools, staff bags, literature, cables, spare parts, and cleaning items need hidden space from the beginning.
Common 30x40 Booth Mistakes to Avoid
A customizable trade show booth rental in Las Vegas uses a reusable booth structure with branded graphics, adaptable counters, display areas, lighting, and meeting zones. It gives exhibitors a faster path than a fully custom build while still requiring logistics planning, drayage timing, labor coordination, and on-site installation at major venues like LVCC, Venetian Expo, and Mandalay Bay.
Too many focal points
If every wall, screen, and counter competes for attention, visitors may miss the main message.
Meeting rooms placed too early
Private spaces should not block the strongest entry path or hide the main booth experience.
Demo areas without enough viewing space
Large demos need room for visitors to stand, watch, ask questions, and move away without crowding the aisle.
Graphics without hierarchy
A large booth needs primary, secondary, and close-range messages. Small text everywhere makes the booth harder to read.
Storage planned too late
Samples, tools, staff bags, literature, cables, spare parts, and cleaning items need hidden space from the beginning.
30x40 Booth Planning Checklist
Define the main visitor journey.
Decide how visitors should enter, what they should see first, and where deeper conversations should happen.
Separate public and private zones.
Demo areas, reception, meeting rooms, storage, and staff support should each have a clear role.
Confirm product and demo requirements.
Large products, samples, equipment, screens, and hands-on demos affect layout, power, and installation.
Plan graphics by viewing distance.
Large walls, hanging signs, lightboxes, and screens should work from the aisle and from inside the booth.
Review fabrication details early.
Wall sections, counters, towers, lightboxes, hardware, and finishes should be checked before packing.
Plan freight and crate order.
Large structures and graphics should be packed so installation teams can access the right components first.
Think through dismantle and reuse.
Is a 30x40 booth considered a large island booth?
A 30x40 booth usually needs more detailed move-in planning for crates, flooring, lighting, product placement, meeting rooms, overhead branding, storage, and trade show booth installation in Las Vegas.
30x40 Booth Planning Checklist
Define the main visitor journey.
Decide how visitors should enter, what they should see first, and where deeper conversations should happen.
Separate public and private zones.
Demo areas, reception, meeting rooms, storage, and staff support should each have a clear role.
Confirm product and demo requirements.
Large products, samples, equipment, screens, and hands-on demos affect layout, power, and installation.
Plan graphics by viewing distance.
Large walls, hanging signs, lightboxes, and screens should work from the aisle and from inside the booth.
Review fabrication details early.
Wall sections, counters, towers, lightboxes, hardware, and finishes should be checked before packing.
Plan freight and crate order.
Large structures and graphics should be packed so installation teams can access the right components first.
Think through dismantle and reuse.
Is a 30x40 booth considered a large island booth?
A customizable trade show booth rental in Las Vegas uses a reusable booth structure with branded graphics, adaptable counters, display areas, lighting, and meeting zones. It gives exhibitors a faster path than a fully custom build while still requiring logistics planning, drayage timing, labor coordination, and on-site installation at major venues like LVCC, Venetian Expo, and Mandalay Bay.
FAQs
Quick clarity on scope, timeline, and execution workflow
Quick clarity on scope, timeline, and execution workflow
Is a 20x30 booth considered an island booth?
Yes. A 30x40 booth is commonly treated as a large island booth because it provides enough space for multiple zones, open visitor paths, branded structures, meeting areas, and product demonstrations.
What can you include in a 30x40 trade show booth?
When should exhibitors choose a 30x40 booth instead of 20x30?
Does a 30x40 booth need more logistics planning?
Planning a 30x40 Booth for an Upcoming Trade Show?
Share your show name, venue, product type, timeline, and booth goals. Circle Exhibit teams can help review layout, branded structures, demo zones, meeting areas, fabrication, logistics, and show-site setup for a practical 30x40 booth plan.