Start With the Result Buyers Need to See
A smart irrigation demo should begin with the result buyers need to understand, not with a long review of controller menus or dashboard features. The outcome should become visible within a few seconds.
That may mean showing:
Flow visibility across zones or abnormal usage.
Remote scheduling through a dashboard or mobile irrigation control interface.
Fault detection for leaks, pressure changes or unexpected flow.
Water-use management based on sensor data and controller actions.
Once the result is defined, the input, control logic, software display and physical response can be organized around it.
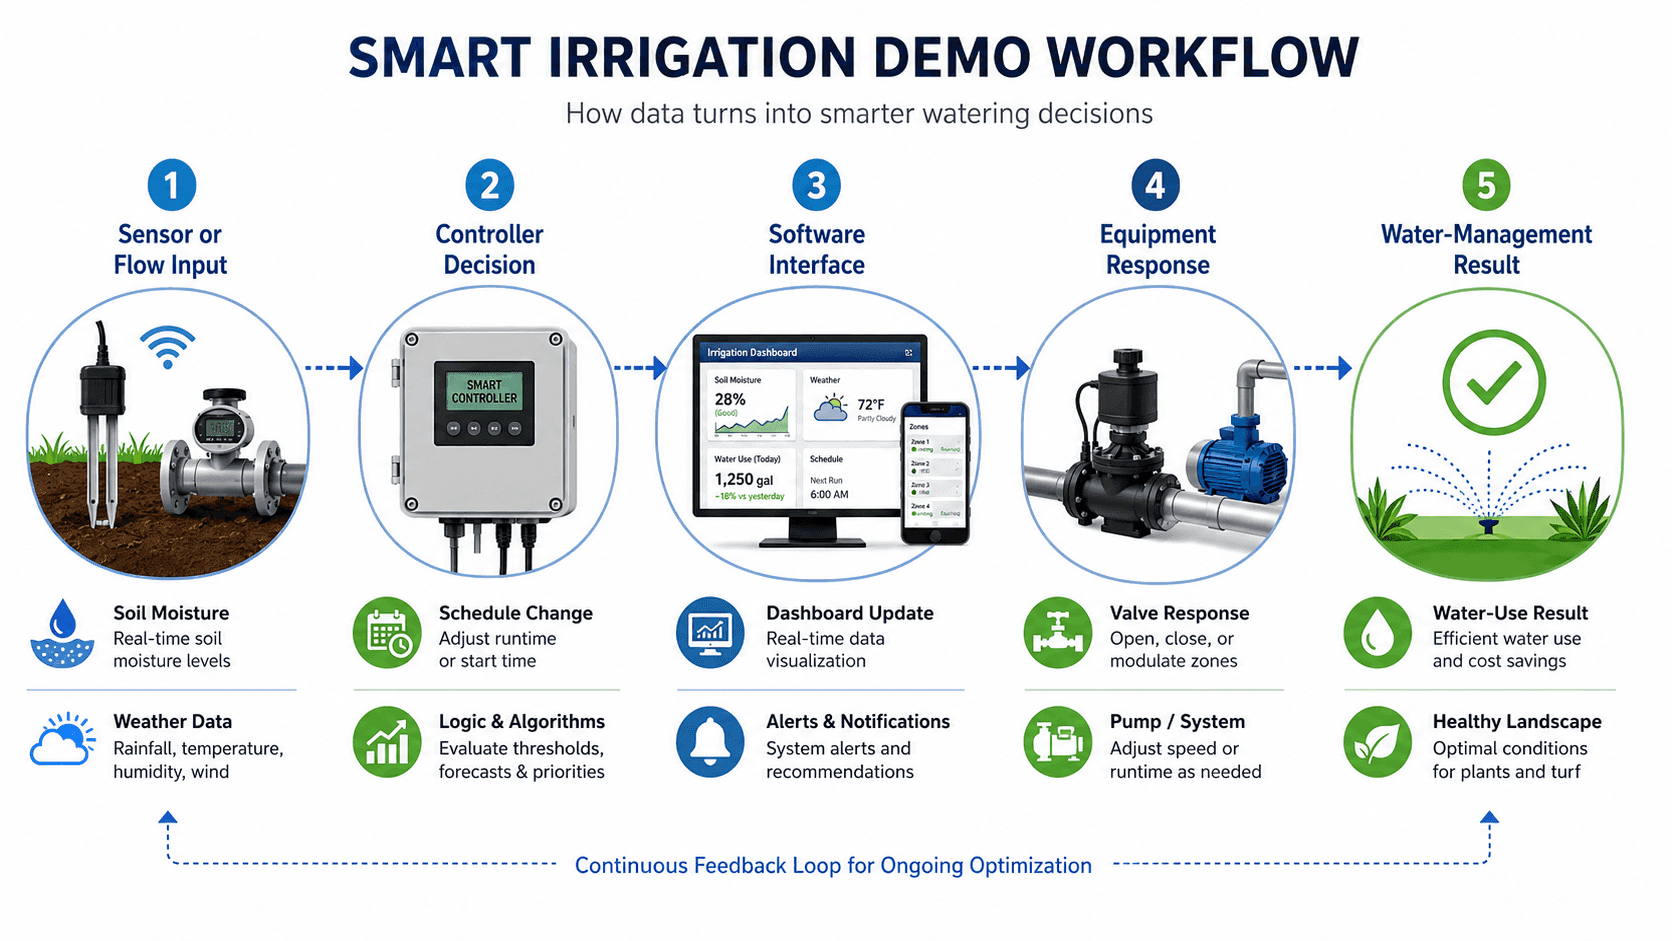
A clear sensor-to-response sequence helps visitors follow how irrigation data moves from the field input to software visibility and physical valve action.
Build the Smart Irrigation Demo Workflow From Sensor Input to Equipment Response
The demonstration does not need to cover every product feature. It should connect one visible input to one control action, one software update and one equipment response, then close with an operating result buyers can understand.
When sensors, controller hardware, screens and working equipment sit in different parts of the display, their sequence must be resolved during trade show booth design and engineering.
Show the Sensor or Flow Input
Start with a recognizable trigger, such as a soil moisture sensor, weather reading or flow meter. When live field data is impractical, use clearly labeled simulated data so visitors still know what started the sequence.
Make the Controller Decision Visible
Show the rule, schedule change, zone command or fault response applied by the controller. Buyers should not need to search through several menus to understand why the system acted.
Show the Decision in the Software Interface
Keep the dashboard, cloud irrigation platform or mobile interface visually connected to the controller hardware. Highlight only the status, alert or schedule change that matters to the demonstration.
Make the Equipment Response Easy to See
Connect the controller or software change to a valve, pump, irrigation zone or contained model. That may mean opening a valve, starting a pump or changing the state of a zone.
The action should be noticeable without requiring a long explanation.
End With a Clear Operating Result
Finish with the practical outcome: a zone opened, unexpected flow was detected, a schedule changed or water use became easier to monitor. The demonstration should end with a useful conclusion rather than another software screen.
Workflow Stage | What Buyers See | What Visitors Need to Understand | Common Failure |
|---|---|---|---|
Sensor or Flow Input | Soil moisture, weather or flow data | Where the data came from and what changed | Visitors cannot identify the trigger |
Controller Decision | A rule, schedule change, zone command or alert | Why the controller responded | The decision remains hidden inside menus |
Software Interface | A dashboard, mobile view or cloud update | Which status or change relates to the input | The screen feels disconnected from the hardware |
Equipment Response | A valve, pump, irrigation zone or model action | What the system physically controlled | The action is too small or delayed to notice |
Operating Result | Confirmed flow status, fault alert, zone shutoff, schedule change or water-use result | What the buyer should remember | The demo ends without a clear takeaway |
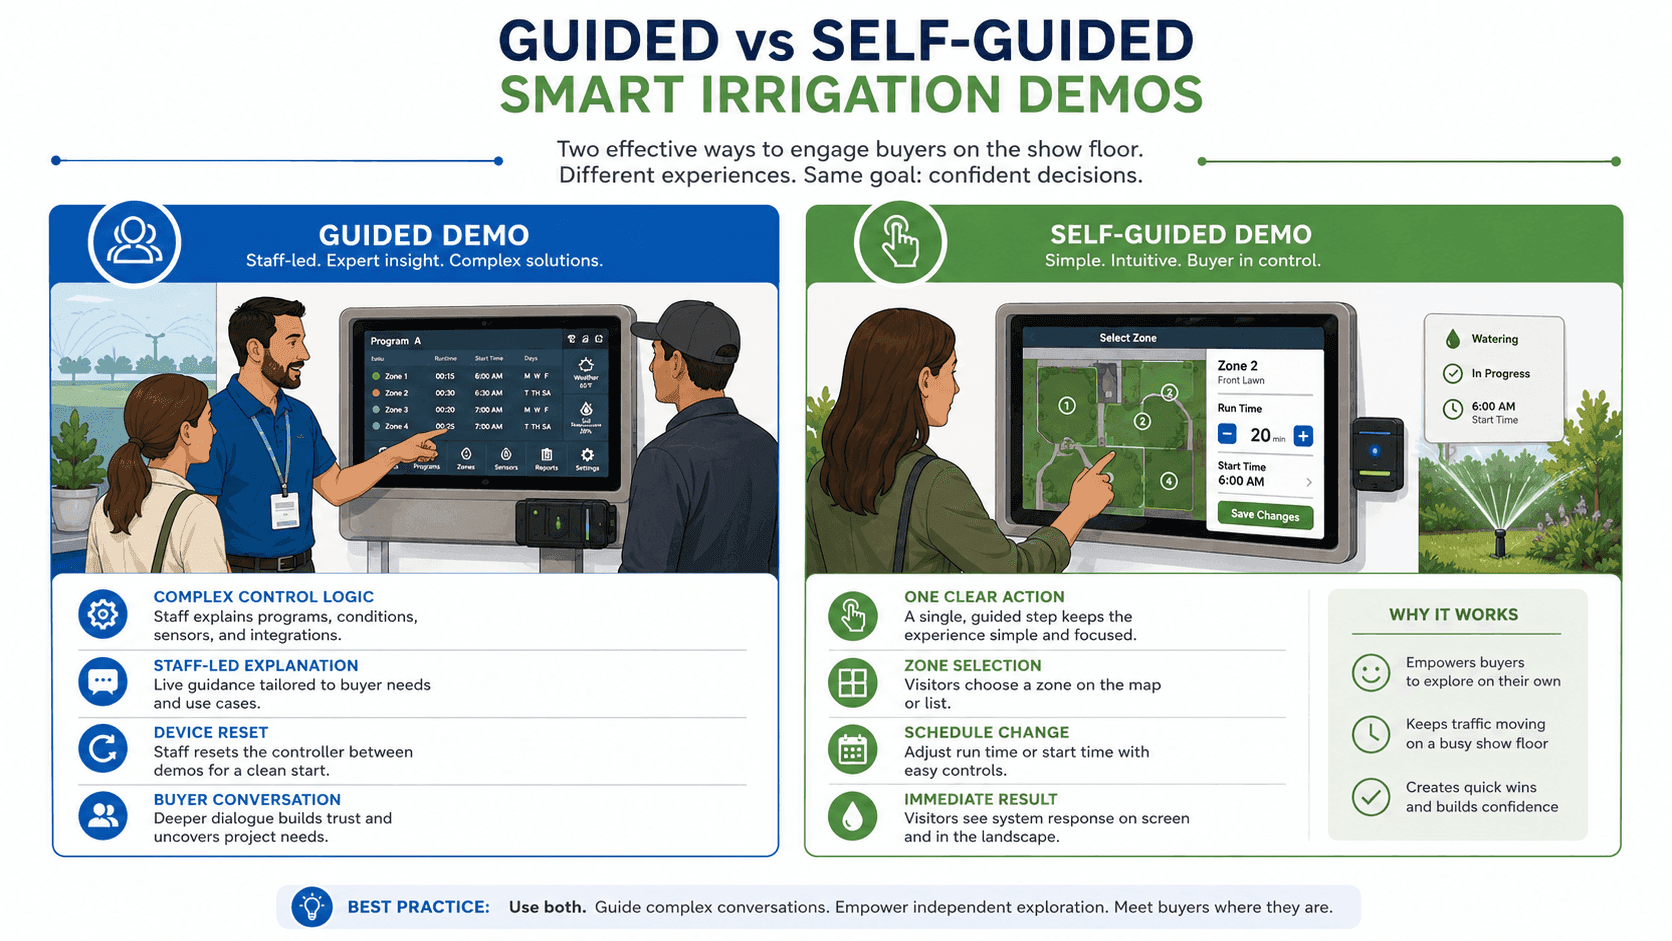
Guided demos support complex control logic, while self-guided stations work best when one simple action produces an immediate and visible result.
Example: From Low Soil Moisture to Valve Response
A soil moisture sensor detects a dry zone and sends the reading to the controller. The controller applies the irrigation rule, updates the dashboard and opens the connected valve.
Low Soil Moisture → Sensor Reading → Controller Decision → Dashboard Update → Valve Response
Keeping the stages visually connected allows visitors to follow the trigger, software change and valve response without restarting the explanation at each point.
Choose a Guided or Self-Guided Demo Based on Product Complexity
The right format depends on how much explanation the product needs. Some systems require staff to connect control logic, software alerts and physical equipment, while others can show their value through one simple action.
Guided Demos Work Better for Complex Control Logic
A guided demo is useful when several devices, settings or technical decisions must be explained together. Staff can control the pace, reset the equipment and move naturally from the demonstration into a buyer conversation.
Self-Guided Demos Need One Clear Action
A self-guided station should give visitors one simple action, such as selecting a zone, changing a schedule or triggering a simulated sensor input. The result should appear without requiring them to move through several screens.
A booth can support both formats by placing a short self-guided interaction near the aisle and reserving the staffed station for more detailed product questions.
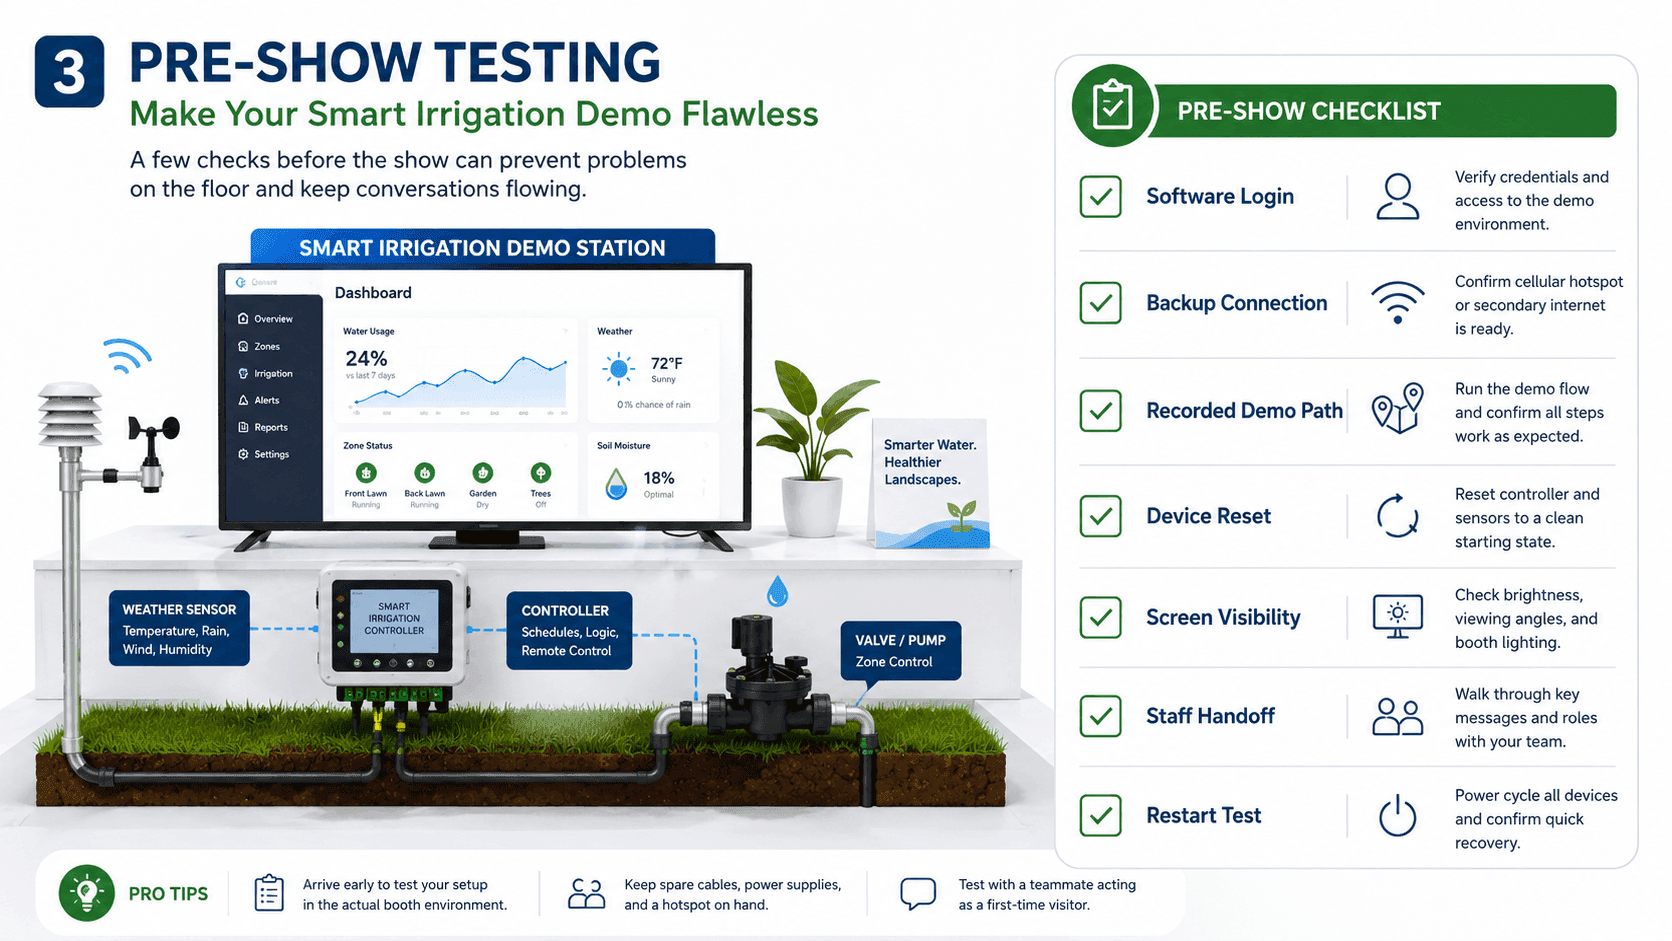
Testing the login, backup connection, screen visibility, equipment reset and staff handoff before opening reduces interruptions during live demonstrations.
Where Smart Irrigation Demos Break Down Before the Show Opens
Many failures appear during setup rather than during the sales conversation. A smart irrigation demo may look complete but still stop working when a login expires, the network drops, the controller fails to reset or the physical response cannot be seen from the aisle.
Before opening:
Confirm every software login and user account.
Test the live connection, the backup connection, and the recorded demo path.
Run a complete controller and device reset.
Check screen visibility from the aisle and operating position.
Confirm when staff should take over the explanation.
Practice the handoff from product demo to buyer conversation.
Time the full sequence, including reset and restart.
Labels, status graphics and screen hierarchy should make the active stage easy to recognize, especially when the software display and working equipment are separated. In this context, booth graphics and brand presentation help visitors follow the demonstration rather than simply decorate the space.
The final pre-show demo test should follow the same order a visitor experiences: input, control action, screen update, physical response, staff handoff and reset.
Frequently Asked Questions
How Long Should a Smart Irrigation Trade Show Demo Take?
The main demo should usually take two to three minutes. That is enough time to show the input, controller response, software update and equipment action without losing aisle visitors.
Can the Demo Work Without Live Field Data?
Yes. Clearly labeled simulated data or a recorded sequence can show soil moisture changes, flow alerts and controller actions when live field data is unavailable or unreliable. The backup version should follow the same smart irrigation demo workflow.
Should a Smart Irrigation Demo Be Guided or Self-Guided?
Use a guided demo when control logic, software alerts or several connected products need explanation. A self-guided demo works better when visitors can complete one simple action and see an immediate result. Some booths can support both.
Once the input, controller action, software update and equipment response can be followed as one sequence, the next step is fitting that workflow around screens, staff access and buyer conversations. Those wider decisions belong to smart irrigation demo booth planning.