A vehicle changes the whole install, not just the final display
A lot of teams treat the display vehicle like one more booth element.
It is not.
Once a vehicle is part of the booth, the install sequence changes from the ground up. The timing changes. The access path changes. Floor protection matters more. Staging becomes more sensitive. And the booth cannot just move forward in the usual order if the vehicle still has to come through the middle of it.
That is why vehicle booths need a different kind of move-in plan.
The biggest mistake is building too much too early
This happens all the time.
The team wants progress, so the booth starts filling in fast. Structure goes up. Flooring moves in. Counters get placed. Product zones start taking shape. The booth begins to look finished.
Then the display vehicle still has to enter.
Now the booth has a problem.
The vehicle path is tighter than it should be. Finished surfaces are exposed too early. Components that looked safely placed are suddenly in the way. The crew has to protect, shift, reopen, or remove things that should not have been locked in yet.
That is where sequencing starts falling apart.
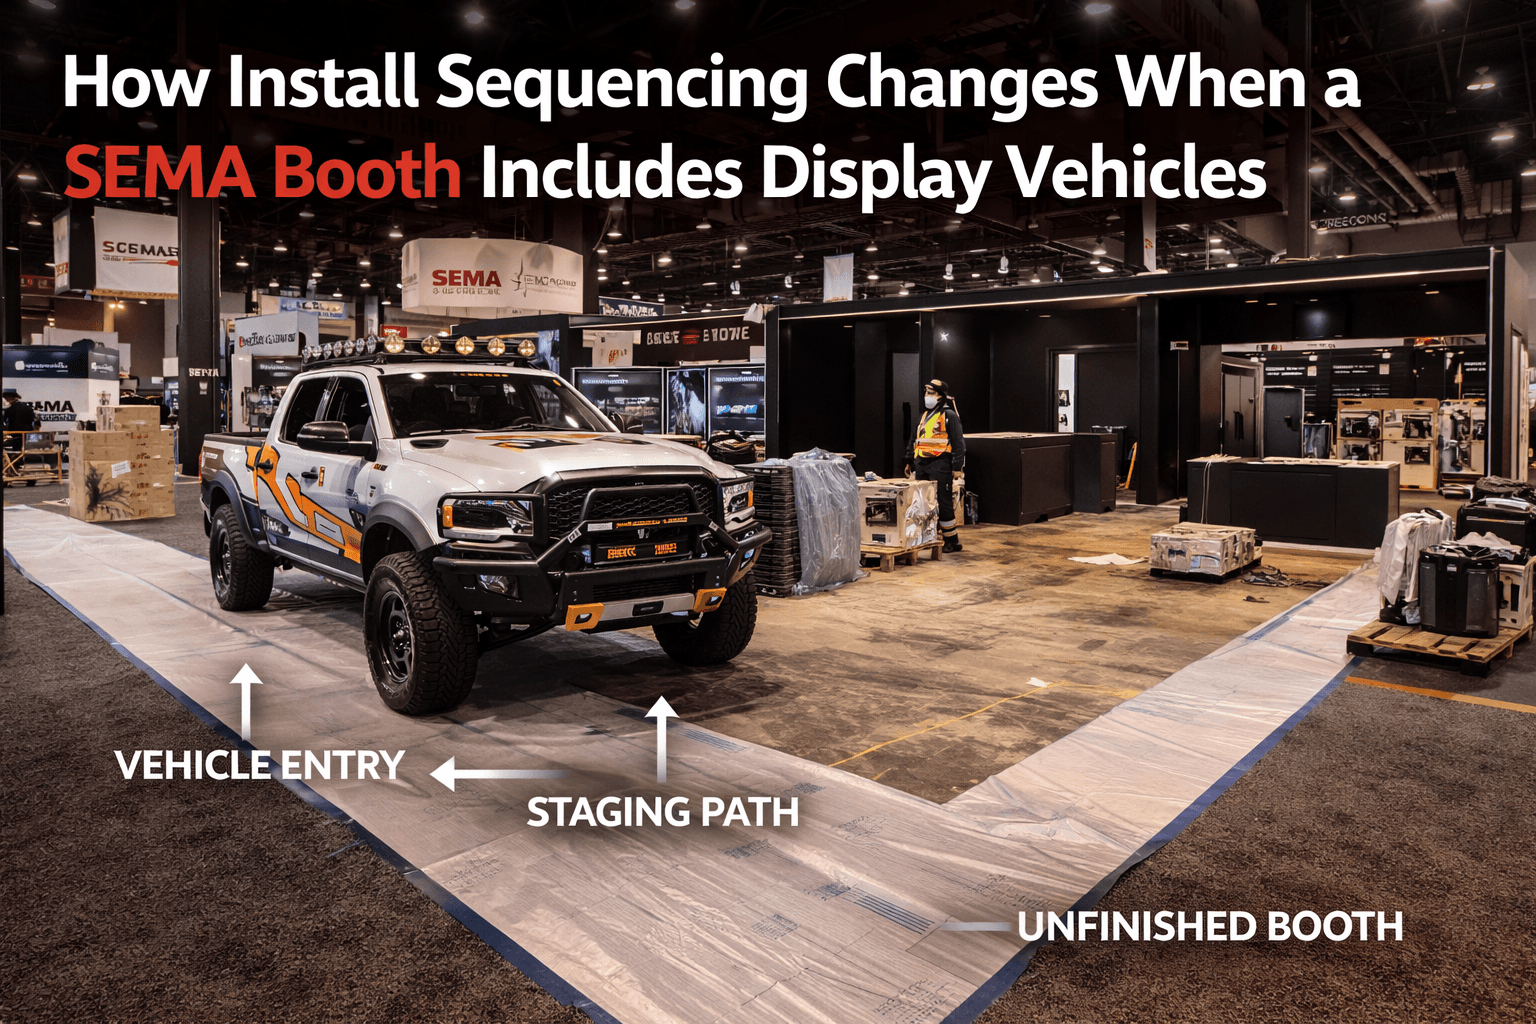
A vehicle booth needs a protected entry path from the beginning
The vehicle does not just need a final parking spot.
It needs a clean way to get there.
That means the install team has to think about:
entry direction
turning space
temporary clearance
floor protection
nearby structure
staging zones that must stay open
If the vehicle path is treated like leftover space, the booth usually ends up reworking itself around the vehicle instead of welcoming it in a controlled way.
A better plan protects that path early and keeps it protected until the vehicle is in position.
Floor protection becomes a much bigger issue
This is one of the clearest differences between a standard booth and a vehicle booth.
In a normal install, finished flooring is already sensitive.
In a SEMA vehicle booth, it becomes a real sequencing risk.
Because now the team has to think about:
tire movement
vehicle weight
turning friction
protective surfaces
when finish flooring is actually safe to expose
If the final floor goes in too early, the booth invites damage.
If the floor strategy is planned properly, the vehicle can move through the booth without turning the finish phase into repair work.
That is why vehicle booths usually need a more deliberate flooring timeline, not just more flooring protection material.
The vehicle should enter before the booth behaves like a finish zone
That is usually the cleanest rule.
A booth can begin taking shape before the vehicle enters, but it should not start acting like a completed environment too soon.
If the vehicle is still outside, the booth should stay honest about what still has to happen.
That usually means some areas remain:
temporarily open
lightly built
protected instead of finished
staged for access rather than appearance
Once the vehicle is in and settled, the booth can tighten up around it.
That order usually produces a cleaner result than trying to finish everything first and then forcing the vehicle into a nearly finished space.
Staging has to work around the vehicle, not against it
A lot of install pressure comes from bad staging.
Crates, tools, parts, counters, shelving, and hardware all need somewhere to sit while the booth is going up. In a vehicle booth, that staging logic gets harder because one of the largest objects in the booth still has to move through the middle.
If the staging zones are not controlled, the vehicle path starts shrinking before anyone means for it to.
That is why the booth needs clearer temporary zones for:
active install tools
parts waiting for later phases
product displays not ready to go in
structure pieces that should not block the vehicle route
The cleaner the staging plan is, the less likely the booth is to start trapping itself before the vehicle arrives.
A 30x40 booth gives the sequencing more room to work
This is one reason a 30x40 trade show booth works so well for SEMA vehicle displays.
It is not just about showing a larger build.
It is about giving the booth enough room to separate:
the vehicle entry path
the staging area
the main display zone
the product zone
the final conversation space
In a tighter booth, these functions start competing almost immediately. In a better 30x40, the install team usually has a much better chance of protecting access while still making visible progress on the booth.
That extra room often translates directly into a cleaner move-in.
Vehicle timing changes the rest of the crew timing too
Once a vehicle enters the install plan, other trades cannot think only about their own scope.
Structure, flooring, graphics, and product display all start depending on the vehicle moment.
That means some tasks may need to wait, including:
final floor finish
low-positioned display placement
delicate graphics near the vehicle path
furniture or counters that sit close to the center zone
This is why vehicle booths often feel slower at first and cleaner at the end.
The sequence is more disciplined.
The team is protecting the install from future conflict, not chasing early visual progress.
Logistics matters more because the vehicle is part of the move-in system
This is where logistics and pre-show coordination become much more important.
A vehicle booth does not just require trucking and delivery. It requires timing logic.
The team needs to know:
when the vehicle enters
what needs to be clear first
what protection is already in place
what cannot be finished before that moment
what follows immediately after the vehicle is parked
If those answers are vague, the install usually becomes reactive.
If those answers are clear, the booth feels much more controlled from the beginning.
Builder planning matters because the vehicle changes the whole booth rhythm
This is one reason exhibitors benefit from working with a Las Vegas trade show booth builder that understands a vehicle booth as an install sequence, not just as a final design.
Because the vehicle affects more than the center display.
It affects:
access
order of work
floor timing
product placement
staging pressure
final finish quality
A booth can look perfect on a rendering and still install badly if the vehicle moment was not built into the sequence from the start.
A better SEMA vehicle install usually follows this order
The strongest vehicle booth installs usually follow a rhythm like this:
1. Protect the vehicle path early
Keep the entry route honest and usable.
2. Build only what can stay out of the way
Make progress without trapping the center.
3. Hold back sensitive finish work
Do not treat the booth like a completed space too soon.
4. Bring the vehicle in at the right moment
Use the cleanest possible path while the booth is still ready for that move.
5. Tighten the booth around the parked vehicle
Complete flooring, product zones, graphics, and final detailing after the center is locked.
That sequence usually gives the booth a much cleaner finish.
Final thought
At SEMA, a display vehicle is not just part of the presentation.
It is part of the installation strategy.
Once the vehicle is involved, the move-in order has to change. The booth needs more disciplined access, better floor protection, and stronger staging control. Teams that respect that usually end up with a cleaner install and a stronger final display.
Teams that ignore it usually spend the last stage of setup undoing work they should not have finished so early.
That is the real difference.
Planning a vehicle booth for SEMA Show?
Start with SEMA booth planning, then connect it to stronger logistics and pre-show coordination so vehicle entry, floor protection, and final booth build happen in the right order.